Python is a popular language for
research computing, and great for general-purpose programming as
well. Installing all of its research packages individually can be
a bit difficult, so we recommend
Conda-forge,
an all-in-one installer.
Regardless of how you choose to install it,
please install the most recent Python version available
by going to the latest download site and scrolling to the Files section to find the download for your operating system.
We will teach Python using the Jupyter Notebook,
a programming environment that runs in a web browser (Jupyter Notebook will be installed by Miniforge). For this to work you will need a reasonably
up-to-date browser. The current versions of the Chrome, Safari and
Firefox browsers are all
supported
(some older browsers, including Internet Explorer version 9
and below, are not).
OneDrive is used by many institutions to sync your user folder (C:\Users\[your-username]\) within an organisation.
It may cause issues with the installation of the Carpentries environment.
If you have OneDrive set up, please ensure that you can access your C:\Users\[your-username]\Downloads folder:
- Open File Explorer
- Right click on the "Downloads" folder in the left-hand navigation pane
- Select "Properties"
- In the "Location" tab, ensure that the path is set to
C:\Users\[your-username]\Downloads
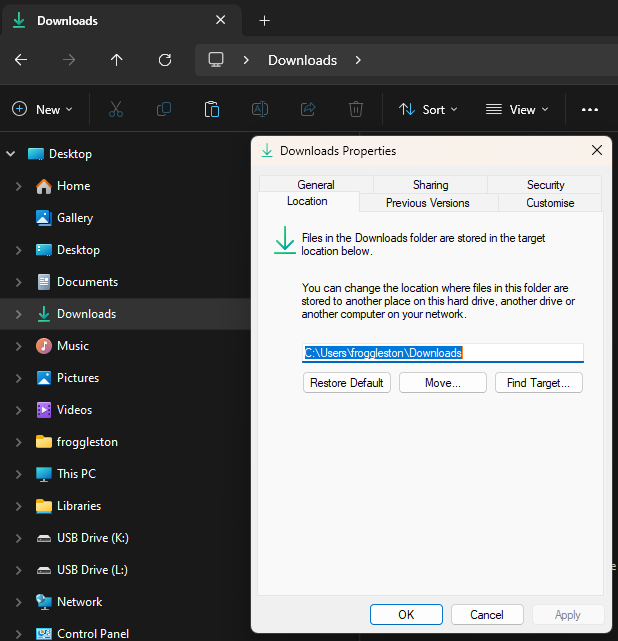
If you encounter problems, please contact your IT support team and workshop organisers for assistance before the workshop.
- Open https://conda-forge.org/download/ with your web browser.
- Download the Miniforge for Windows installer
- Double click on the downloaded file (Something like,
Minforge3-Windows-x86_64.exe)
- If you get a "Windows protected your PC" pop-up from Microsoft Defender SmartScreen, click on "More info" and select "Run anyway"
- Follow through the installer using all of the defaults for installation except make sure to check Add Miniforge3 to my PATH environment variable.
- Then:
- EITHER:
- Right click the following link and click "Save link as...": Carpentries environment file
- Save the file to your
C:\Users\[your-username]\Downloads folder.
-
Make sure that the filename is
carpentries_environment.yml and the "Save as type" option is set to YML file (*.yml)
The following steps requires using the Miniforge Prompt command line. If you aren't comfortable doing the installation yourself stop here and request help at the workshop.
- OR:
- Open Git Bash
cd ~/Downloadscurl -L -O https://raw.githubusercontent.com/carpentries/workshop-template/refs/heads/gh-pages/data/carpentries_environment.yml
- Open your Start Menu from your taskbar, or use the Win Windows key.
- Search for the application "Miniforge Prompt", and click the icon to open it.
- Once open, ensure the prompt shows your
C:\Users\[your-username] folder. If it does, continue to Step 8 below:
![Miniforge Prompt [your-username] as froggleston](assets/img/miniforge_prompt.png)
In this case, the prompt shows C:\Users\froggleston. Your username will be different!
- If it doesn't:
- Find your username by typing
whoami and press Enter
- Your username will be shown as
[machine-name]\[your-username]. You only need the [your-username] part after the slash, i.e. froggleston in this example.
- Type
cd C:\Users\[your-username] and press Enter

- If you get stuck, please contact your workshop organisers to get assistance before the workshop starts.
- In the Miniforge Prompt window, run the following commands:
- Type
cd Downloads and press Enter
- Type
conda env create -f carpentries_environment.yml and press Enter
- The installation may take a few minutes depending on your internet connection speed. Once complete, you can close the Miniforge Prompt window.
- Open https://conda-forge.org/download/ with your web browser.
- Download the appropriate Miniforge installer for macOS
The following steps require using the shell. If you aren't comfortable doing the installation yourself stop here and request help at the workshop.
-
Open a terminal window and navigate to the directory where the executable is downloaded (e.g.,
cd ~/Downloads).
-
Type
bash Miniforge3-
and then press Tab to autocomplete the full file name.
The name of file you just downloaded should appear.
Press Enter (or Return depending on your keyboard).
-
Follow the text-only prompts in the terminal. To move through the text, press Spacebar.
- Type
yes and press Enter (or Return) to approve the license.
- Press Enter (or Return) to approve the default location for the files.
- Type
yes and press Enter (or Return) to prepend Miniforge to your PATH (this makes the Miniforge distribution the default Python).
- Then:
- EITHER:
- Right click the following link and click "Save link as...": Carpentries environment file
- Save the file to your
Downloads folder.
- Make sure that the filename is
carpentries_environment.yml and the "Save as type" is set to YML file (*.yml)
- OR :
- Open your `bash` terminal
cd ~/Downloadscurl -L -O https://raw.githubusercontent.com/carpentries/workshop-template/refs/heads/gh-pages/data/carpentries_environment.yml
- In the terminal, run:
conda env create -f ~/Downloads/carpentries_environment.yml
- Close the terminal window.
- Open https://conda-forge.org/download/ with your web browser.
- Download the appropriate Miniforge installer for Linux
The following steps require using the shell. If you aren't comfortable doing the installation yourself stop here and request help at the workshop.
-
Open a terminal window and navigate to the directory where the executable is downloaded (e.g.,
cd ~/Downloads).
-
Type
bash Miniforge3-
and then press Tab to autocomplete the full file name.
The name of file you just downloaded should appear.
Press Enter (or Return depending on your keyboard).
-
Follow the text-only prompts in the terminal.
To move through the text, press Spacebar.
- Type
yes and press Enter (or Return) to approve the license.
- Press Enter (or Return) to approve the default location for the files.
- Type
yes and press Enter (or Return) to prepend Miniforge to your PATH (this makes the Miniforge distribution the default Python).
- Then:
- EITHER:
- Right click the following link and click "Save link as...": Carpentries environment file
- Save the file to your
Downloads folder.
- Make sure that the filename is
carpentries_environment.yml and the "Save as type" is set to YML file (*.yml)
- OR :
- Open your terminal
cd ~/Downloadscurl -L -O https://raw.githubusercontent.com/carpentries/workshop-template/refs/heads/gh-pages/data/carpentries_environment.yml
- In the terminal, run:
conda env create -f ~/Downloads/carpentries_environment.yml
- Close the terminal window.